우분투에서 Oracle DB 설치
Table of contents
우분투에서 오라클을 설치하기 위해서는 리눅스용 11g, 12g 만 지원한다고 한다. 무료인 XE 버전으로 설치한다.
설치파일 다운로드
https://www.oracle.com/database/technologies/xe-prior-release-downloads.html
위 링크에 접속 후 로그인하여 Oracle Database 11gR2 Express Edition for Linux x64 버전을 다운받는다.
다운로드 폴더에서 압축을 해제한다.
user1@user1-500R5K-501R5K-500R5Q:~/Downloads$ unzip oracle-xe-11.2.0-1.0.x86_64.rpm.zip
Archive:  oracle-xe-11.2.0-1.0.x86_64.rpm.zip
   creating: Disk1/
   creating: Disk1/upgrade/
  inflating: Disk1/upgrade/gen_inst.sql
   creating: Disk1/response/
  inflating: Disk1/response/xe.rsp
  inflating: Disk1/oracle-xe-11.2.0-1.0.x86_64.rpm
user1@user1-500R5K-501R5K-500R5Q:~/Downloads$
필수 패키지 및 오라클 설치
오라클 설치위한 필수 패키지 들을 설치한다.
user1@user1-500R5K-501R5K-500R5Q:~/Downloads$ sudo apt -y install alien libaio1 unixodbc
rpm 파일을 deb 로 변환하기 위해 아래 명령어를 실행한다.
user1@user1-500R5K-501R5K-500R5Q:~/Downloads/Disk1$ sudo alien --scripts -d oracle-xe-11.2.0-1.0.x86_64.rpm

oracle-xe_11.2.0-2_amd64.deb generated
deb 파일로부터 오라클을 설치한다.
user1@user1-500R5K-501R5K-500R5Q:~/Downloads/Disk1$ sudo dpkg --install oracle-xe_11.2.0-2_amd64.deb
Selecting previously unselected package oracle-xe.
(Reading database ... 245679 files and directories currently installed.)
Preparing to unpack oracle-xe_11.2.0-2_amd64.deb ...
Unpacking oracle-xe (11.2.0-2) ...
Setting up oracle-xe (11.2.0-2) ...
Executing post-install steps...
/var/lib/dpkg/info/oracle-xe.postinst: line 114: /sbin/chkconfig: No such file or directory
You must run '/etc/init.d/oracle-xe configure' as the root user to configure the database.

Processing triggers for libc-bin (2.31-0ubuntu9.12) ...
Processing triggers for systemd (245.4-4ubuntu3.22) ...
Processing triggers for gnome-menus (3.36.0-1ubuntu1) ...
Processing triggers for desktop-file-utils (0.24-1ubuntu3) ...
Processing triggers for mime-support (3.64ubuntu1) ...
위에 언급된 대로 아래 명령어를 실행시켜 기본 설정인 포트, 비밀번호를 설정한다.
user1@user1-500R5K-501R5K-500R5Q:~/Downloads/Disk1$ sudo /etc/init.d/oracle-xe configure

Oracle Database 11g Express Edition Configuration
-------------------------------------------------
This will configure on-boot properties of Oracle Database 11g Express
Edition.  The following questions will determine whether the database should
be starting upon system boot, the ports it will use, and the passwords that
will be used for database accounts.  Press <Enter> to accept the defaults.
Ctrl-C will abort.

Specify the HTTP port that will be used for Oracle Application Express [8080]:5050

Specify a port that will be used for the database listener [1521]:15217

Specify a password to be used for database accounts.  Note that the same
password will be used for SYS and SYSTEM.  Oracle recommends the use of
different passwords for each database account.  This can be done after
initial configuration:
Password can't be null. Enter password:
Confirm the password: 1234 //테스트 위함.

Do you want Oracle Database 11g Express Edition to be started on boot (y/n) [y]:y

Starting Oracle Net Listener...Done
Configuring database...Done
Starting Oracle Database 11g Express Edition instance...Done
Installation completed successfully.
bashrc 로 들어가서 환경 변수를 설정해 준다.
user1@user1-500R5K-501R5K-500R5Q:~$ vi ~/.bashrc

#아래 설정을 넣어준다.
export ORACLE_HOME=/u01/app/oracle/product/11.2.0/xe
export ORACLE_SID=XE
export NLS_LANG=`$ORACLE_HOME/bin/nls_lang.sh`
export ORACLE_BASE=/u01/app/oracle
export LD_LIBRARY_PATH=$ORACLE_HOME/lib:$LD_LIBRARY_PATH
export PATH=$ORACLE_HOME/bin:$PATH
리스너 상태 확인하기
특히 아래에서 안될때가 많은데 아래 들을 확인해 보는 것이 좋다.
- 재부팅하기
- etc/hosts 에 사용자 계정으로 localhost 추가하기
- oracle service restart 하기
user1@user1-500R5K-501R5K-500R5Q:/u01/app/oracle/product/11.2.0/xe/bin$ ./lsnrctl

LSNRCTL for Linux: Version 11.2.0.2.0 - Production on 28-NOV-2023 22:01:11

Copyright (c) 1991, 2011, Oracle.  All rights reserved.

Welcome to LSNRCTL, type "help" for information.

LSNRCTL> status
Connecting to (DESCRIPTION=(ADDRESS=(PROTOCOL=IPC)(KEY=EXTPROC_FOR_XE)))
STATUS of the LISTENER
------------------------
Alias                     LISTENER
Version                   TNSLSNR for Linux: Version 11.2.0.2.0 - Production
Start Date                28-NOV-2023 22:00:50
Uptime                    0 days 0 hr. 0 min. 21 sec
Trace Level               off
Security                  ON: Local OS Authentication
SNMP                      OFF
Default Service           XE
Listener Parameter File   /u01/app/oracle/product/11.2.0/xe/network/admin/listener.ora
Listener Log File         /u01/app/oracle/diag/tnslsnr/user1-500R5K-501R5K-500R5Q/listener/alert/log.xml
Listening Endpoints Summary...
  (DESCRIPTION=(ADDRESS=(PROTOCOL=ipc)(KEY=EXTPROC_FOR_XE)))
  (DESCRIPTION=(ADDRESS=(PROTOCOL=tcp)(HOST=user1-500R5K-501R5K-500R5Q)(PORT=15217)))
  (DESCRIPTION=(ADDRESS=(PROTOCOL=tcp)(HOST=user1-500R5K-501R5K-500R5Q)(PORT=5050))(Presentation=HTTP)(Session=RAW))
Services Summary...
Service "PLSExtProc" has 1 instance(s).
  Instance "PLSExtProc", status UNKNOWN, has 1 handler(s) for this service...
Service "XE" has 1 instance(s).
  Instance "XE", status READY, has 1 handler(s) for this service...
Service "XEXDB" has 1 instance(s).
  Instance "XE", status READY, has 1 handler(s) for this service...
The command completed successfully
LSNRCTL>
user1@user1-500R5K-501R5K-500R5Q:/u01/app/oracle/product/11.2.0/xe/bin$ sqlplus system

SQL*Plus: Release 11.2.0.2.0 Production on Tue Nov 28 22:03:39 2023

Copyright (c) 1982, 2011, Oracle.  All rights reserved.

Enter password:

Connected to:
Oracle Database 11g Express Edition Release 11.2.0.2.0 - 64bit Production

SQL> select SYSDATE from dual;

SYSDATE
------------------
28-NOV-23

SQL>
접속 계정 생성
SQL> create user testuser identified by 1234;

User created.

SQL> grant connect, resource to testuser;

Grant succeeded.

SQL>
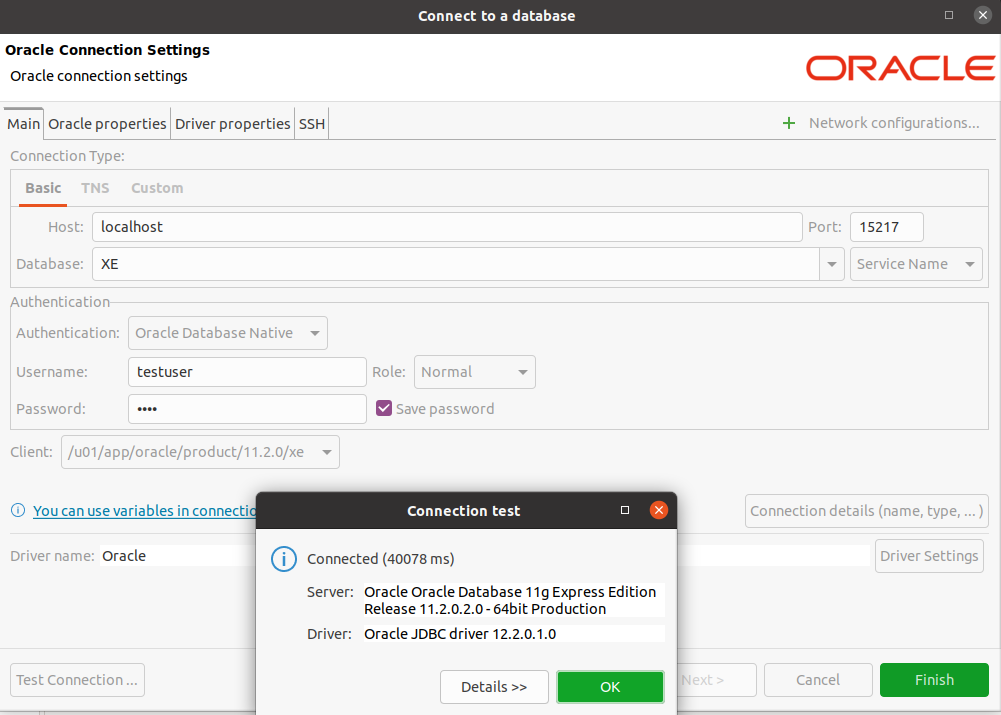
이후에는 DBeaver 과 같은 접속 툴을 활용하여 접속한다.